Monday, October 28, 2013

Wreath

I would include this project in my "Pinned There, Done That" category, but I'm not actually sure I pinned it... I think I had to stop pinning wreaths. As I've stated, I like to pin things I plan can do, not just things I dream about or drool over, and if I made all the wreaths I dreamed about and drooled over... my attic would explode. BUT. There were some super-cute tutu wreaths I saw, mostly springy or birthday themes, but I realized I am shockingly low on Halloween decorations and my sister had some black tulle, soooooo....


 I made it! I at least made one super-cute wreath.

It's hard to see the fun play of smooth round wreath-form surrounded my exploding tulle when it's straight black, so this angle gets it a bit better.


Simple chipboard letters from Hobby Lobby, painted orange and hot glued on. Then I went old-school and busted out a toothbrush and black paint and speckled it. It reminded me of a shelf I decorated with my friend in middle school, we splatter painted with toothbrushes on that bad-boy, too.

All in all, happy I stopped pinned and started working! I've done a few more pinned projects since then but they need to remain surprises since Christmas is only about 9 weeks away (YIPES).


Bold and The Beautiful: Part 2

I am so impressed at how this project is going - I've never seen Joe get to a project so intensely! Well, maybe the one time we redid our downstairs bathroom in Thornton, but he was getting all crazy and halfway through got struck down by Strep throat so then the rest of the project dragged.... but I have a feeling this will be different. For one, this is more INTENSE. More ripping out means more putting back together. For another, on the last bathroom he was rushing to get it done before company comes (that's how we usually roll) and stayed up until 1 a.m. so when he got sick he wasn't nearly well-rested enough to battle back; this time he works until Ethan goes to bed (Ethan's wall IS the bathroom wall) and then we chill and watch some Netflix. Even with all the downtime the project is FLYING!
 
 Ceiling and wall completely ripped out. Joe needed to work on some wiring because the last fixture wasn't secured with a junction box, but he needed to work on some plumbing because he couldn't FIT a junction box, so now we have some slightly-moved pipes, a per-code light installation, and the world's most basic (and ugly) placeholder light.

 Whoa, when did THAT shower basin get here?! It took about a week, but Joe formed it up himself, installed a new drain, poured the concrete, laid the gray waterproof membrane, and has it ready for another layer of concrete - the layer where we set tile!

 Before tiles comes walls, of course, and now that these are re-plumbed and they're ready for some hardi-backer boards. I thought you could see it when I took the picture, but there is also a new can light in the ceiling! More light! Hooray! Joe wired that in solo, like it ain't no thang :) Notice how there is no longer a dangling showerhead? Yep, he cut that out and re-piped the faucet to the interior wall. The showerhead looks like it's missing, but really it's in the....

CEILING! We're going to have a rain showerhead! Not shown, of course, just the plumbing fittings for it, but I am so stoked. I will be singin' in the rain.

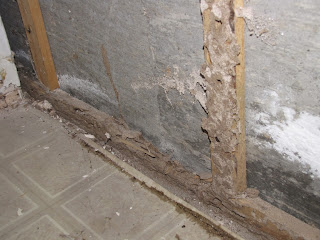
Every DIY project has to have a snag, of course, so a minor snag on our project was ripping out the drywall on the exterior wall - carpenter ants had had their way and the drywall was destroyed, as were some of the furring strips (boards secured to the concrete so that you can fasten drywall to them, instead of drywall to the concrete). This was just a good opportunity for Joe to buy a new tool: a hammer drill to nail new strips to the concrete. What's a home project without a new tool to decorate the garage?

Saturday, October 26, 2013

Stylin'

Free tattoos from Old Navy = fun for mom!
This inspires me to whip up a black and red cape so he can be a magician for Halloween.

Wednesday, October 23, 2013

The Bold and the (soon-to-be) Beautiful: Part 1

It is SO MUCH FUN having a husband who is as nuts as I am!
 
We've been talking about what to do about our downstairs bathroom ever since the day we moved in. It's not only small, they managed to make a small space even more cramped with some poor design choices, which also made the small cramped space feel dark (in spite of a large window). After hemming and hawing for a whole year we made a plan. Last Tuesday after dropping Patrick off at school Joe wondered what we might do that day; I raised my eyebrows and said, "Well, we've been talking about doing that bathroom..." and BOOM. Joe grabbed a hammer, a crowbar, I grabbed my camera, and within 24 hours here was the progression:
 
 Walking into the bathroom (through the laundry room) you see our new sliding door on rails, aka barn door, installed 2 weeks prior.
 
Kind of a cool rough, industrial look. We'll be playing off that when choosing finishes. That implies we will be finishing things, of course, like painting and putting new trim around the door frame.

 Here's as you walk into the small bathroom - the water heater has a room of its own. It looks ok, but it takes up a lot of space, particularly because it's directly across from the boxed-in shower, seen below.
 
 
See? Pretty narrow, especially with the door swing. 
 
Basic and boring... but I won't get too down on it, since we're not changing much. The water heater room will stay, in spite of its insatiable appetite for floor space.The ledge, though, is getting downsized, and towel bar has already bitten the dust.

World's narrowest sink. The wall on the left had that ledge that stuck out an extra 2 inches and cramped your left elbow, the wall on the right extended past the shower form a good 4 inches and made it seem like a small hallway to get to the sink, PLUS a towel bar in your way cramping your right elbow.

 There's the shower it boxed in. Thanks to the wall blocking light from the only fixture in the room and the overhand blocking light from the window, the shower was seriously dark.
 
 It was all a game of smoke and shadows.

 
 24 HOURS LATER...


 No Wall! No water-damaged sink! No mirror! No cheap light fixture! NO WALL! (Did I mention that?) There is, however, pipes hanging down in the middle of the room because that's the wall they plumbed the showerhead into. Don't worry, we'll take care of that later...

 No drywall! No shower! Just a drain in the floor and a big ol' trash can to catch all the stuff coming out of the small (but feeling bigger) room.

 No ceiling, either! Had to take it down so Joe could redo the plumbing. Like the free-floating showerhead?
 
A better idea of how weird it is so have plumbing just hanging around.

Stay tuned for Part 2, where crazy amount of progress is made in less than 2 weeks...

Sunday, October 6, 2013

Kitchy Kitchy Cool

Anyone who has visited my house has been told the sad (sad, sad, SAD) tale of our kitchen remodel, but I've not posted about it because it's just too depressing. But finally, we got it fixed, so here's the whole tale, made easily readable for those of you with short attention spans. Like me.

1. Move in. Kitchen cabinets are deep brown with a brick veneer backsplash. Well, they tried to be cute, I guess.
2. Paint Kitchen green, which doesn't match brown cabinets, but DOES match our plans to...
3. Paint the cabinets WHITE. This is done over a period of about 2 months, since it takes so many dang coats of white to make it look perfect.
4. Perfect! Seal it off with polyurethane so no kids' sticky fingers will damage the paint job
The day we finished!
 
5. Put in new countertops, sink, and white subway tile backsplash. The job looks GREAT!
Until we start to notice the white cabinets next to the white tile are not looking so white anymore...
Two weeks later...
 
Four weeks later...

That's when we discover:
6. POLYURETHANE DAMAGES THE PAINT JOB. Turns out we used oil-based, which turns white paint yellow; what we needed was water-based. We were SO CLOSE!
7. Cry. Pout. Discuss the benefits of leaving it smoker-stained yellow. But mostly pout.
8. Wait until  a string of family visits happens over the summer, then disassemble the yellow kitchen cabinets.
After a complete kitchen re-do, we're forced to begin again

9. Pout.
10. Over a 2-month period, strip ALL the paint off - this step took as long, if not longer, than painting the cabinets the first time. All that work so the cabinets can be at square one again, back to a deep brown....*sigh*
11. Re-prime, re-paint, re-hang.

12. Never do that again.

Now up next in the kitchen saga will be cleaning the tile and grout.  It's tan with dark splotches, and never looks clean no matter how swept & mopped I keep it. Kari pinned a grout-cleaning recipe that I decided to try, since the girl's "before" picture looks exactly like my kitchen right now...
...and sure enough, her "in progress" picture look exactly the same as mine!

Turns out my grout is tan, not brown! The tile is all light, no dark splotches! But it takes some serious scrubbing with a hand-brush to get all the low texture points clean. We'll re-seal the tile and grout when I'm done. Not with oil-based polyurethane, of course.


 So the recipe is 7 cups water, 1/2 cup baking soda, 1/3 cup ammonia, and 1/4 cup vinegar. It smells slightly of vinegar, but mostly it smells like nothing. For something that smells like nothing, it works like EVERYTHING. Please come over soon to "ooooh" and "ahhhhh" in person!

Friday, October 4, 2013

Prince Charming

Remember how 2 months ago I could hardly stand Ethan? Oh, man, 10 months old was a rough age for that particular kid. But NOW... haha! 12 months old is AWE-SOME! I absolutely adore this kid (and it has nothing to do with my last post). Now that he walks he seems much more able to entertain himself, which is not only GREAT it is CUTER THAN CRAP.

For one things, he is still snuggly, if not more snuggly than ever! Every time you pick him up from his little self-entertaining world he is happy to just rest his head against your neck. Bonus: it's not just me! He snuggles Joe as well (unlike Caroline, who is a Mommy's Girl to an unfortunate extreme). DOUBLE bonus: He no longer bites, thank heaven.

For another, look at that HAIR! It's kind of a white 'fro, it's so tall, but we do absolutely nothing with it - no hair products to enhance what nature gave him! It unfailingly receives comments (and a few head rubs) when we take him out shopping.

Here he is entertaining himself by brushing this T-Rex's teeth. He was downstairs brushing away and must have been pretty intent on doing a good job because I first died laughing, then got Joe and we died laughing together, and THEN I got the camera.


Also, he found the perfect place to play hide and seek - under these (newly) upholstered chairs! They're a personal project of mine, I'm pretty proud of them. Joe bought the chairs from Arc, they were faded and frayed and flowery but only $5 apiece, so I got my craft on and now they're pretty cute. Not as cute as the little man underneath them, though :)